
As of Minecraft 1.8, skins now have an extra layer all over the body as opposed to just the head. This means that player models can now have sleeves and pants. The complex skin layout is twice the size of the older layout with a dimension of 64x64 pixels whereas the old layout is sized at 64x32 pixels. Blue color marks the extra layer of texture.
As far as making skins for Mine Little Pony is concerned, the process remains the same for most part. It is important to note that leg textures are no longer mirrored, all legs now have their own texture space. Also left and right legs have different sides that face outward as well as sides that face inward; simply copying right leg textures to use on the left side won’t work.

Download Twilight Sparkle complex skin
Notice the bottom leg textures and how their faces are differently positioned. For right legs, the faces are, from left to right, inward > front > outward > back whereas left leg faces are inward > front > outward > back. Body alignment is the same as the older skin layout.
The legacy skin layout uses the pre-1.8 skin template and is a good place to start if you have little or no experience making Mine Little Pony skins. Basic components like the head, hair, arms, legs and torso are kept in the same place and non-human parts such as the horn, wings, ears and extra textures are squeezed into unused areas. Below is a scaled-up and labeled template of Mine Little Pony skin.
The blue pixels in the upper left corner are trigger pixels, read more about them below.
T - top, BT - bottom, F - front, B - back, R - right, L - left

A comparison between a standard definition (SD) Twilight Sparkle skin and the default Steve skin shows where the extra parts go:


Download Twilight Sparkle simple skin
The foreleg and hind leg textures are mirrored for the other side of the body as well as the body side textures. For more detailed skins, pay close attention to how some textures are flipped and mirrored around the player model. Use the guide below to see how body textures are matched up. Red color marks flipped textures.
The texture for the wings may seem a bit confusing. It may look like it is the texture for the entire wingspan, but this is only true when they are folded. When extended, the whole area is used for every single feather, meaning the exact same texture is used for all of the feathers. In actuality, they are skinned similarly to a 2x2 leg or arm.
You can use trigger pixels to determine the species of pony you are, the length of your tail, the gender, and the size of your pony. This is done by coloring the top left pixels of your Mine Little Pony skin a specific color.
![]()
NORMAL
x: 0, y: 0 | HEX | Description | |
|---|---|---|
------- | Human | |
#F9B131 | Earth pony | |
#88CAF0 | Pegasus | |
#D19FE4 | Unicorn | |
#FEF9FC | Alicorn | |
#282B29 | Changeling | |
#D0CCCF | Zebra | |
#CAED5A | Reformed Changeling | |
#AE9145 | Gryphon | |
#D6DDAC | Hippogriff | |
#FA88AF | Kirin | |
#EEEEEE | Batpony | |
#3655DD | Seapony |
NORMAL
x: 1, y: 0 | HEX | Description | |
|---|---|---|
#425844 | Stub | |
#D19FE4 | Quarter | |
#534B76 | Half | |
#8A6B7F | Three Quarters | |
------- | Full |
NORMAL
x: 2, y: 0 | HEX | Description | |
|---|---|---|
------- | Rounded | |
#FFFFFF | Squared | |
#888888 | Flat |
NORMAL
x: 3, y: 0 | HEX | Description | |
|---|---|---|
#534B76 | Tall | |
#CE3254 | Bulky | |
#3254CE | Lanky | |
------- | Normal | |
#B2E7DD | Stocky | |
#A3D2C7 | Squat | |
#53BEFF | Yearling | |
#FFBE53 | Foal |
RAW
x: 0, y: 1 | HEX | Description | |
|---|---|---|
------- | Any color of your choice |
CONDENSED
x: 1, y: 1 | HEX | Description | |
|---|---|---|
#16 | Crown | |
#32 | Muffin | |
#64 | Hat | |
#96 | Antlers | |
#C6 | Saddle Bags Left | |
#C7 | Saddle Bags Right | |
#C8 | Saddle Bags Both | |
#FA | Stetson |
NORMAL
x: 2, y: 1 | HEX | Description | |
|---|---|---|
------- | Straight | |
#FC539F | Bumpy | |
#3EFF22 | Swirly | |
#3308C7 | Spiky |
NUMBER
x: 2, y: 2 | HEX | Description | |
|---|---|---|
------- | Any integer between 0 and 16777215 |
Trigger pixels must use the specified colors and must stay in the above configuration. A skin without trigger pixels will not be registered as a Mine Little Pony skin. It is not recommened to use a screen color picker to sample the colors. Copy and paste the hex color codes instead or use our tool.
Pony gear is the first of the skinning options that uses the new “Condensed Trigger Pixel Format” (CTPF for short) which allows you to select any combination of up to three values in the same pixel space.
To use this, you have to use an editor that allows for selecting colors based on their RGB values. (eg. GIMP, Paint.NET, Photoshop, and most others should all have this capability) Every value in this system is selected by setting any one of the respective pixel’s channels to the same number corresponding to that value.
Words are horrible for explaining this, so here’s a chart:
If you want to set option (1) on a pixel, you would set any of the pixel’s three channels to the value (1). So following pixels would work:
| R | G | B | | :-: | :-: | :-: | | 1 | 0 | 0 |
As would any of these others:
| R | G | B | | :-: | :-: | :-: | | 0 | 1 | 0 | | 0 | 0 | 1 | | 1 | 1 | 1 | | 0 | 1 | 0 | | 23 | 40 | 1 |
Really, as long as (1) is present in either of the channels, that pixel will reflect as having the value (1). You can also add values together, meaning the last example (23 | 40 | 1) would also reflect as having the value (23) and the value (40).
These are just examples, though, so here’s some actual values and what they mean!
| R | G | B | Description | | :-: | :-: | :-: | :-------------------------------------------------- | | 50 | 250 | 100 | Muffin Hat and AJ’s stetson and the Witch’s hat | | 200 | 0 | 0 | Just saddle bags (what most people might want) | | 50 | 0 | 0 | Muffin Hat (glory to the muffin queen!) |
As mentioned above, Saddle Bags are the only set of gear that is currently skinnable. They occupy the same area as the wings on Pegasi, and affect how wings are skinned on flying races. Look, I know this might be confusing, and you might be wondering “But Zombie how on Earth do I do the pixels for this?!” Well wonder no more! Here for your convenience is an example skin of my OC but with all three hats enabled!

Now let’s see how this is actually accomplished!


Download the Stardust Accessory Example Skin!
Notice how the RGB Values for the outlined pixel correspond to the values for each hat? It’s really a lot simpler than it sounds, but if this guide doesn’t help you enough feel free to download the example skin so you can see how it works for yourself!
Priority pixel is used to decide which skin to use when you have HD Skins installed and have skins both on our server and Mojang’s. If both skins have the same race (e.g. on pony-level HUMANS, or if both are ponies) the skin with the highest priority will be chosen. If both have the same priority, the skin from our server will be used.
Mine Little Pony supports high definition (HD) skins in both the old and new skin layouts. HD skins can vary in resolution but their dimensions must be multiples of the original SD skin. For the older layout which is sized at 64x32, HD skins can be 128x64, 256x128, or 512x256. HD skins using the new layout can be sized at 64x64, 128x128, 256x256, 512x512, 1024x1024.

HD skins must still follow the template for SD skins. Notice how the trigger pixels in the HD skin on the right aren’t scaled up along with the rest of the skin. It is important that the trigger pixels are kept the same size and in the same configuration for Mine Little Pony to register the skin as a pony skin.
With the addition of Batponies and Seaponies, it is now possible to distinguish the features of each respective race. Batponies include different wings and ear tufts, and Seaponies include fish tails when submerged in water. Changelings get special bug wings, which can be seen in the example skins below. Zebras have longer necks and mohawks.
It is also now also possible to wear hats and saddlebags. While hats can not be textured, saddlebags can, taking up the wing spot in the skin texture. For texture reference please see the templates
Here’s a couple example skins showing off the skins and how the new features are textured!


Download the four example skins
Regular SD skins can be uploaded to Minecraft.net like a normal skin. Make sure to select the “My skin fits on the classic ‘Steve’ player model” option. Both skin layouts can be uploaded to Minecraft.net

Both SD and HD skins can be uploaded to Mine Little Pony’s skin server which is independent from Minecraft’s skin server. Skins uploaded to Mine Little Pony’s server can only be seen by other clients with Mine Little Pony installed
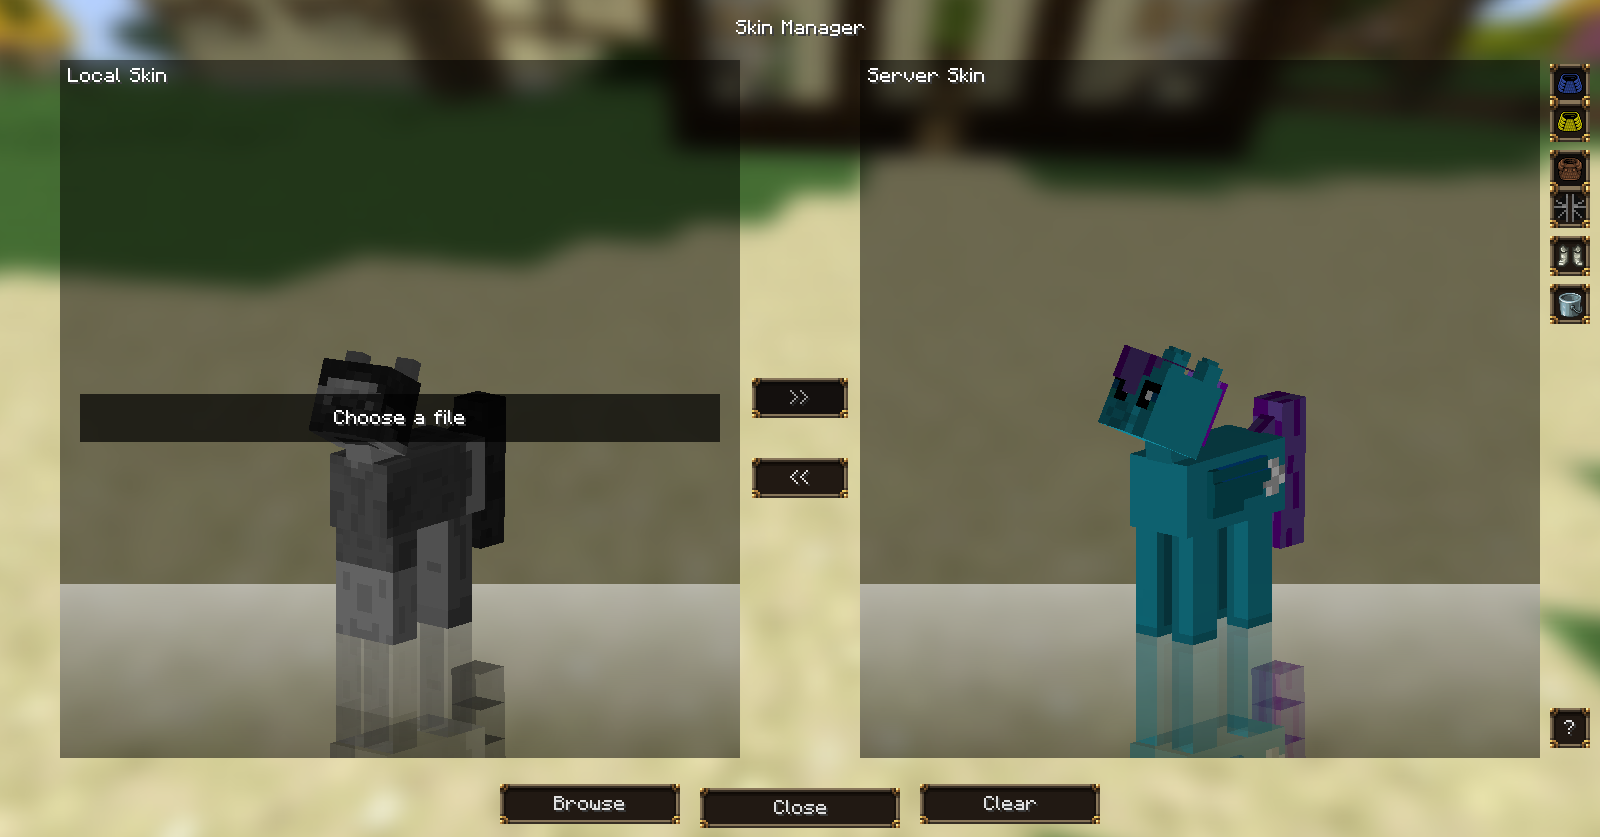
To upload a skin to Mine Little Pony’s skin server, launch the game with Mine Little Pony installed. When at the home screen (the screen with the panning panorama) press the icon with the leather pants on it. This should open HD Skins manager. Drag and drop the skin on it or click the browse button to browse through your files if you prefer. Click the ”>>” button and your skin will upload to the server. It may take some time for skin changes to be visible to other players
